What's on this page
- What roof pitch actually measures
- Pitch, slope, and the fraction convention
- The three measurement methods, and how they differ
- Method 1: the attic, against a rafter
- Method 2: on the roof surface
- Method 3: from the ground
- The fall hazard, stated plainly
- The tools, and what each one is good for
- Converting a pitch to degrees with the arctangent
- Converting degrees back into a pitch
- Deriving the slope multiplier from Pythagoras
- The multiplier table, and how to rebuild any row
- Rafter length falls out of the same triangle
- Ridge height, span, and run
- Worked example: measuring a 6 in 12 roof three ways
- What pitch decides: material suitability
- Low-slope roofs are a different trade
- What pitch decides: walkability and labor
- What pitch decides: drainage, wind, and snow
- Common pitch families and what they signal
- Roofs with more than one pitch
- Where a pitch measurement goes wrong
- Checking a measured pitch before you order
- The bottom line
A roof pitch is one measurement, taken in about two minutes, that then decides four separate things: which roofing materials are even permitted on the slope, how much surface area the roof actually has, whether anyone can stand on it, and what the job will cost in labor. Almost nothing else on a house does that much work from a single number. And yet it is the number most often guessed, eyeballed from the driveway, or copied from a neighbor’s roof that merely looks similar, which is how orders come up short and quotes come back with a surprise in them.
This article covers the measurement itself and nothing downstream of it. Three methods are set out with their honest trade-offs, from inside the attic (the recommended default), from the roof surface, and from the ground. Then the two conversions everyone eventually needs: pitch to degrees using the arctangent, and pitch to the slope multiplier using Pythagoras, both derived rather than looked up so you can compute any pitch instead of hunting for a row in a table. Once you have the pitch, our shingle manual takes it through to squares and bundles, and our estimator handles the area arithmetic on the way.
Key takeaways
- Pitch is rise per 12 inches of horizontal run: measure the vertical gap between a level and the roof at the 12 inch mark, and that gap in inches is the pitch.
- The attic method, against the underside of a rafter, is the safest and usually the most accurate. Roof work is a genuine fall hazard and no measurement is worth an injury.
- Pitch to degrees is arctan(rise ÷ 12), so 6 in 12 is about 26.57 degrees and 12 in 12 is exactly 45 degrees. Going back, rise equals 12 × tan(angle).
- The slope multiplier is √(144 + rise²) ÷ 12, straight from the right triangle, so 6 in 12 gives 1.118 and adds about 11.8 percent to the footprint area.
- Pitch decides material suitability, walkability, and drainage, but minimum slopes are set by your local building authority and the product's own instructions, never by a chart.
What roof pitch actually measures
Pitch describes how steeply a roof plane climbs, expressed as a ratio of vertical rise to horizontal run. The convention that makes it a usable trade number is that the run is always fixed at 12 inches. So a roof described as “6 in 12” climbs 6 inches vertically for every 12 inches traveled horizontally, and one described as “4 in 12” climbs 4 inches over the same 12. The run never changes, which means the only variable anyone has to communicate is the rise, and that is why a roofer can say “it’s an eight” and be completely understood.
Two things follow from that definition and both catch people out. The first is that the run is horizontal, not along the roof surface. It is the distance you would travel if you walked underneath the roof on level ground, not the distance you would travel crawling up the shingles. The second is that pitch is a property of a plane, not of a house. A building can carry three or four different pitches across its main roof, its porch, its dormers, and an addition, and each one has to be measured separately because each one behaves differently in every calculation that follows.
Pitch, slope, and the fraction convention
Two words are in circulation for this and they are not strictly synonyms, which causes real errors when someone reads an old drawing literally. In everyday trade language, pitch and slope both mean the same thing: rise per 12 inches of run, spoken as “six in twelve” and often written 6:12 or 6/12. Nobody on a job site will misunderstand you.
In the stricter traditional sense used in framing texts and older architectural drawings, the two words split. Slope is rise over run, expressed as x in 12. Pitch is rise over the full span of the building, expressed as a plain fraction. On a symmetrical gable the run is half the span, so the fraction is always half the slope ratio. A 6 in 12 slope has a rise-to-run ratio of 1/2, and therefore a rise-to-span ratio of 1/4, which the old convention calls a quarter pitch.
The families that recur in that older notation are worth recognizing: a half pitch is 12 in 12, a third pitch is 8 in 12, a quarter pitch is 6 in 12, a sixth pitch is 4 in 12, an eighth pitch is 3 in 12, and a twelfth pitch is 2 in 12. If a drawing says “1/4 pitch” and someone builds a 4 in 12 roof because a quarter of 12 is 3 and 4 felt safer, the framing is wrong before a single rafter is cut.
The three measurement methods, and how they differ
Every practical way of getting a pitch reduces to the same operation: establish a true horizontal line, travel 12 inches along it, and measure the vertical distance to the roof plane. What separates the methods is only where you stand while doing it, and that choice trades accuracy against risk in a way worth stating before any of them are described in detail.
Measuring inside the attic is the safest and usually the most accurate, because a rafter is a straight, clean, sawn edge and you are standing on joists in an enclosed space rather than on a slope at height. Measuring on the roof surface is accurate too, and it has the advantage of confirming the plane you actually care about, but it puts a person on a roof, which is the single most dangerous part of any roofing job. Measuring from the ground is the least accurate of the three, sometimes by a meaningful margin, but it requires nothing beyond a level, a tape, and a straight line of sight.
The order in that paragraph is the order of preference. If you can get into the attic, do that. If the attic is inaccessible or fully finished, work from the ground and accept a rounder answer. Getting onto the roof purely to measure a pitch is rarely the right trade, because the two safer methods will both land you on the same whole-inch figure on almost any normal roof.

Method 1: the attic, against a rafter
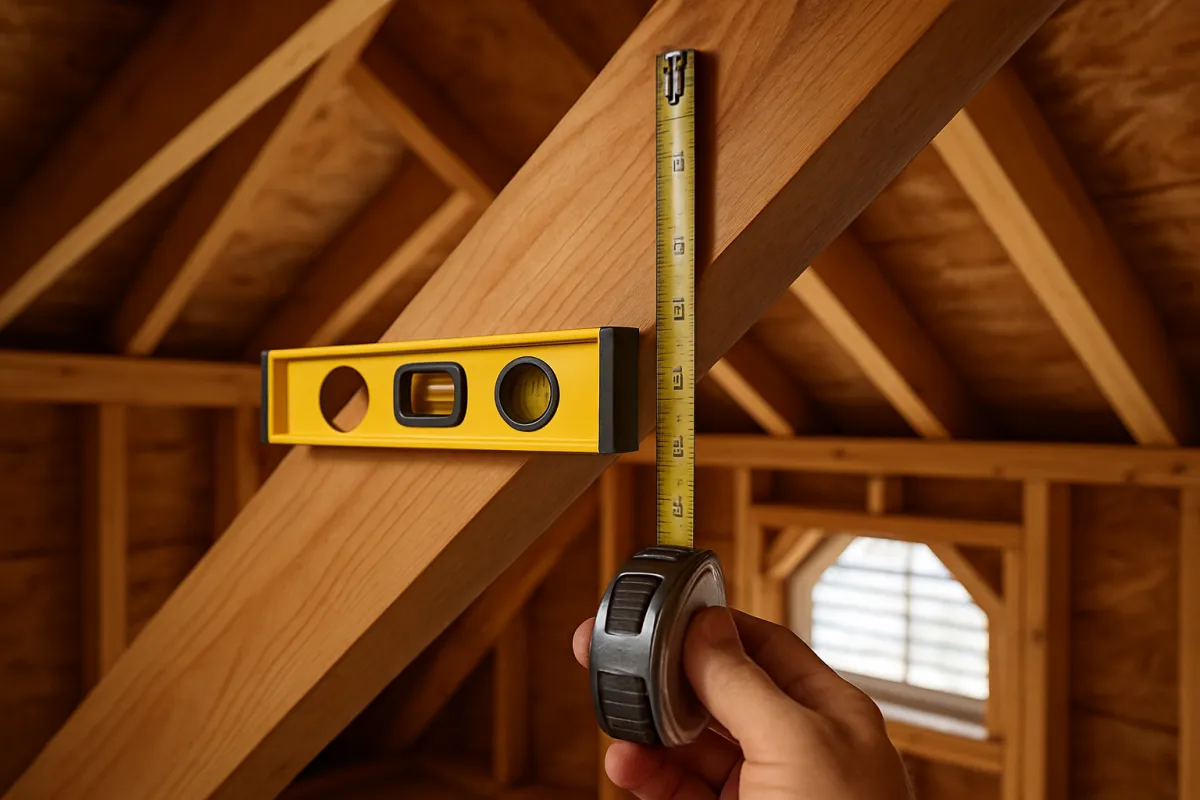
This is the method to reach for first. Rafters and the roof deck they support share the same slope, so a measurement taken against the underside of a rafter is a measurement of the roof, taken from a place where nobody can fall off anything.
Take a level (12 inch or 24 inch), a tape measure, a pencil, and a light. Step only on the joists or on boarding laid across them, because attic insulation hides the gaps and a ceiling will not hold a person. Pick a rafter with a clear straight run, away from any splice, brace, or collar tie that might sit proud of the face.
Hold one end of the level against the underside of the rafter and bring the bubble to center so the level is dead horizontal. Mark 12 inches along the level from the contact end. Now measure the vertical distance between the level and the rafter’s underside at that mark, holding the tape truly plumb rather than square to the rafter. That distance in inches is the rise, and the pitch is that number in 12.
If you are using a 24 inch level, measure the gap at the 24 inch mark and divide by 2. A longer level is more forgiving of a small wobble at the contact end, which is why many people prefer it, but the division is easy to forget in a dusty attic. Whichever you use, take the measurement twice at different points along the rafter and against a second rafter if you can reach one. Agreement between three readings is what tells you the number is real.
Method 2: on the roof surface
Measuring on the roof itself uses the identical operation, with the level resting on the shingles instead of a rafter. One end of the level touches the roof surface, the bubble is centered, and the vertical drop is measured at the 12 inch mark. Because you are measuring the finished plane rather than the framing beneath it, there is no chance of a sagged deck or an unusual rafter detail throwing the reading off.
That is the entire upside, and it is a modest one. The downsides are that shingle granules and the shadow lines between courses make the contact point less crisp than a sawn rafter edge, and that being on the roof is the part of this job that hurts people. If someone is already up there for another reason, with proper access, fall protection, and dry conditions, taking a pitch reading while they are there is sensible. Making a special trip up a ladder to take one is not.
There is a middle version worth knowing. From a properly footed and tied-off ladder at the rake edge of a gable, you can often reach the roof surface or the rake board without leaving the ladder, and take the same reading with the level held out in front of you. It is less exposed than standing on the slope, though a ladder at height is still a ladder at height, and holding a level steady with one hand while reading a tape with the other is precisely the kind of two-handed task that ladder safety practice warns against.
Method 3: from the ground
Two ground-based approaches get you a usable pitch with both feet on the lawn.
The first uses the gable end. On most houses the sloped rake trim comes down close to the eave, low enough to reach from the ground or from the bottom rungs of a ladder. Hold the level horizontally with one end touching the underside or the face of that rake board, center the bubble, and measure the vertical gap at the 12 inch mark exactly as in the attic. The rake board follows the roof plane, so the reading is the roof’s pitch. Check that the trim you are measuring is actually the sloped rake and not a horizontal fascia return, which will read as zero and confuse everybody.
The second uses the rafter tails. Where the eave is open, or where a soffit has an access panel, the underside of the rafter tail is exposed and sits at the same angle as everything above it. A short level against that surface gives the same measurement in miniature, and a digital angle finder or an inclinometer app laid on the same surface will read the angle directly in degrees, which converts back to a pitch with the tangent formula further down this article.
The third ground option is photographic. Stand well back from the gable end, square to the wall, and take a straight-on photo. Measure the roof triangle’s rise and run in the image with a ruler, divide rise by run, and multiply by 12. Ratios survive scaling, so the answer on the photograph is the answer on the building, provided the camera was genuinely square to the gable and the lens is not distorting the edges. Treat it as a sanity check rather than an order-placing number.
The fall hazard, stated plainly
Falls from height are among the most serious hazards in residential construction, and a roof combines every ingredient: elevation, a sloping working surface, unprotected edges on all sides, and sheathing whose condition cannot be verified from below. A pitch measurement is worth two minutes. It is not worth any part of that risk, and the honest position of this manual is that the attic method exists precisely so nobody has to take it.
If work at height happens anyway, the basics are not optional refinements: a ladder set at a proper angle on firm level ground and tied off at the top, three points of contact while climbing, appropriate footwear, dry conditions, fall protection where the situation calls for it, and another person present who knows you are up there. Wet, frosty, or mossy surfaces, brittle old shingles in cold weather, and any softness underfoot that suggests a compromised deck all mean stop rather than proceed carefully.
Steep pitch multiplies all of it. A slope where a slip becomes a slide is a different proposition from one where a slip is a stumble, and the boundary between those is lower than most people expect once dew or granule dust is involved. If the roof needs work rather than just a number, that is a conversation about hiring an insured professional, not a conversation about technique.
The tools, and what each one is good for
A 12 inch level and a tape measure will do the whole job, and for a single reading that is the entire kit. The 12 inch length is convenient because the mark you need is the far end, with no arithmetic afterward, though a torpedo level of that size can be harder to hold steady against a rafter than something longer.
A 24 inch level trades that convenience for stability. It bridges more of the rafter’s surface, so a local dip or a knot has less influence, and the reading at 24 inches is a bigger number that resolves half-inch differences more clearly. Divide the drop by 2 and you are back to rise per 12.
A dedicated pitch gauge, sometimes sold as a roof slope finder, is a small pivoting tool that reads the pitch directly when held against a sloped surface. It is quick and it removes the arithmetic, and its accuracy still depends on the surface being clean and the tool being held square to the plane rather than twisted across it.
A digital angle finder or a phone inclinometer reads the angle in degrees. That is genuinely useful when the surface you can reach is small, such as a rafter tail, because a level needs 12 inches of straight edge and an angle finder needs only a few. The conversion back to a pitch is one tangent calculation. Calibrate the tool on a known flat surface first, since phone sensors drift and a two degree offset is a quarter-inch error in the pitch.

Converting a pitch to degrees with the arctangent
Sooner or later somebody wants the angle. Angle finders read in degrees, framing calculators want degrees, and any trigonometry you do on the roof structure needs degrees or radians rather than a colon-separated pair.
The conversion is one function. The rise and the run are the opposite and adjacent sides of a right triangle, so their ratio is the tangent of the roof’s angle above horizontal. Reverse that and the angle is the arctangent of rise divided by run, which with the run fixed at 12 becomes:
Angle in degrees = arctan(rise ÷ 12)
Work a 6 in 12 roof through it. Rise divided by run is 6 ÷ 12, which is 0.5. The arctangent of 0.5 is about 26.57 degrees. On a calculator that is 0.5, then the inverse tangent key, usually printed tan⁻¹ or atan, with the mode set to degrees. A calculator left in radians returns 0.4636, which is the same angle in different units and a common source of confusion.
The check that catches a mode error instantly is 12 in 12. Rise divided by run is 1, and the arctangent of 1 is exactly 45 degrees, because a triangle with two equal legs is a 45 degree triangle. If your calculator says 0.785 you are in radians. If it says anything else, something in the keystrokes is wrong.
| Roof pitch | rise ÷ 12 | Angle from horizontal |
|---|---|---|
| 1 in 12 | 0.0833 | 4.76° |
| 2 in 12 | 0.1667 | 9.46° |
| 3 in 12 | 0.25 | 14.04° |
| 4 in 12 | 0.3333 | 18.43° |
| 5 in 12 | 0.4167 | 22.62° |
| 6 in 12 | 0.5 | 26.57° |
| 7 in 12 | 0.5833 | 30.26° |
| 8 in 12 | 0.6667 | 33.69° |
| 9 in 12 | 0.75 | 36.87° |
| 10 in 12 | 0.8333 | 39.81° |
| 11 in 12 | 0.9167 | 42.51° |
| 12 in 12 | 1.0 | 45.00° |
Pitch in degrees, and why the scale is not linear
Angle above horizontal from arctan(rise ÷ 12), plotted against a 45 degree maximum.
Each bar width is that angle divided by the 45 degree maximum. Notice the compression at the top: going from 2 to 4 in 12 buys nearly 9 degrees, while going from 10 to 12 in 12 buys just over 5. The tangent function flattens as the rise grows, which is why steep roofs feel far more alike underfoot than their pitch numbers suggest.
Converting degrees back into a pitch
The reverse conversion matters whenever your reading came from an angle finder, a phone, or a drawing annotated in degrees, and you need to talk to a supplier or a roofer who thinks in twelfths.
Rearranging the same relationship gives:
Rise = 12 × tan(angle)
A 30 degree roof has a tangent of 0.5774, so the rise is 12 × 0.5774, or about 6.93 inches per 12 of run. That is a shade under 7 in 12. A 20 degree roof is 12 × 0.3640, or about 4.37 in 12. A 40 degree roof is 12 × 0.8391, or about 10.07 in 12, which is essentially a 10 in 12.
Notice what those results imply. Real roofs are framed to whole or half inch rises because that is how rafters get cut and how framing squares are laid out, so a degree measurement almost never lands on a clean pitch. When it lands close, round to the nearest common pitch and treat the difference as measurement error. When it lands genuinely between two, at 5.5 in 12 for example, that can be real, since half-inch pitches do get built, and it can equally be a level that was not quite horizontal. Measure again by a different method before deciding.
For estimating purposes the rounding rarely matters much. The multiplier difference between 6.93 in 12 and 7 in 12 is under a tenth of a percent of area. For framing purposes it matters a great deal, because a rafter cut to the wrong angle does not sit down on the plate.
Deriving the slope multiplier from Pythagoras
Here is the conversion that turns a pitch into money. Any area you can measure on the ground or read off a plan is a flat, horizontal, plan area. The roof covering that footprint is a tilted plane, and a tilted plane is always larger than its own shadow. The ratio between them is the slope multiplier, and it comes straight out of the triangle rather than out of anybody’s table.
The rise and the run are the two legs of a right triangle. The rafter running up the slope is the hypotenuse. By Pythagoras, that hypotenuse measures √(12² + rise²), and since the run is 12, the ratio of sloped length to horizontal length is:
Slope multiplier = √(144 + rise²) ÷ 12
The plane is stretched only along the direction of the slope and not at all across it, so the same ratio that applies to length applies to area. Multiply a plan area by the multiplier and you have roof surface area.
Run a 6 in 12 through it. Rise squared is 36, plus 144 is 180, and √180 is 13.416. Divided by 12 that is 1.118, so a 6 in 12 roof surface is about 11.8 percent larger than the footprint beneath it. Two pitches come out exactly, which is a satisfying check on the method: 5 in 12 gives √169 ÷ 12, or exactly 13 ÷ 12, and 9 in 12 gives √225 ÷ 12, or exactly 15 ÷ 12. Those are the familiar 5-12-13 and 9-12-15 right triangles wearing roofing clothes.
The multiplier table, and how to rebuild any row
Every figure below is the same formula run at a different rise, which means you never have to trust a table you cannot regenerate. Pitch multiplier tables circulate widely and not all of them agree, usually because of rounding, so a table you can rebuild on a phone in ten seconds is the only kind worth using. These are the same values our shingle manual applies when it turns a footprint into squares.
| Roof pitch (rise per 12 of run) | Multiplier, √(144 + rise²) ÷ 12 | Extra area over the footprint |
|---|---|---|
| 2 in 12 | 1.014 | +1.4% |
| 3 in 12 | 1.031 | +3.1% |
| 4 in 12 | 1.054 | +5.4% |
| 5 in 12 | 1.083 | +8.3% |
| 6 in 12 | 1.118 | +11.8% |
| 7 in 12 | 1.158 | +15.8% |
| 8 in 12 | 1.202 | +20.2% |
| 9 in 12 | 1.250 | +25.0% |
| 10 in 12 | 1.302 | +30.2% |
| 12 in 12 | 1.414 | +41.4% |
The bottom row is worth staring at. A 12 in 12 roof is a 45 degree plane, and its multiplier is √288 ÷ 12, which is √2, the same 1.414 that turns up in the diagonal of every square anyone has ever measured. Steeper pitches keep going: 16 in 12 gives 1.667 and 18 in 12 gives 1.803, which are the tower and turret territory where the roof surface is nearly twice its own footprint.
Where the slope's extra area accumulates
The 41.4 percent that a 12 in 12 roof adds over its footprint, split by which third of the pitch range delivers it.
Segments sum to 100 percent of the 41.4 point total, computed as the multiplier differences 1.054 − 1.000, 1.202 − 1.054, and 1.414 − 1.202. Half the extra area a steep roof carries arrives in the top third of the range, which is why skipping the multiplier is harmless on a shed roof and expensive on a Victorian one.
Rafter length falls out of the same triangle
Once the multiplier is in hand, one more useful number costs nothing. The horizontal distance from the outside of the wall to the ridge is the run of the rafter. Multiply that run by the slope multiplier and you have the sloped length of the rafter itself, measured along its top edge from the plate to the ridge.
On a building 30 feet wide with a ridge down the center, each side has a run of 15 feet. At 6 in 12 the rafter along that run measures 15 × 1.118, or about 16.77 feet. Add the horizontal overhang before multiplying if you want the full length including the tail: a 12 inch overhang makes the horizontal distance 16 feet, and 16 × 1.118 is about 17.89 feet of sloped length. That is the eave-to-ridge dimension you would use to lay out a roof plane as a rectangle.
Two caveats keep this honest. Framing practice subtracts half the ridge board’s thickness from the run before cutting, and the plumb cuts at each end mean the board you buy has to be longer than the theoretical line. This manual is estimating material, not cutting rafters, so treat the multiplied figure as the surface dimension rather than a cut list. For anything structural the calculation belongs to whoever is doing the framing.
The same relationship also runs backward. If you can measure the sloped distance from eave to ridge and you know the horizontal run, dividing one by the other gives the multiplier, and solving √(144 + rise²) ÷ 12 for rise gives the pitch. It is a clumsier route than a level and a tape, but it works when the only access you have is a long tape along a rake edge.
Ridge height, span, and run
Three words get mixed up constantly and they are easy to keep straight once separated. The span is the full width of the building the roof crosses, wall to wall. The run is the horizontal distance covered by one rafter, which on a symmetrical gable is half the span. The rise is the vertical height the roof gains across that run, from the top of the wall to the underside of the ridge.
The pitch ties them together. Total rise equals the run multiplied by the pitch ratio, which is rise-per-12 divided by 12. On a 30 foot span, the run is 15 feet, or 180 inches. At 6 in 12 the ratio is 0.5, so the total rise is 90 inches, or 7.5 feet. The ridge on that house sits 7.5 feet above the eave line, which is why a 6 in 12 roof on a wide house produces a genuinely usable attic and the same pitch on a narrow garage produces a crawl space.
That relationship also explains a common piece of confusion, which is why two roofs with identical pitches look so different. Pitch is a rate, not a height. A 4 in 12 roof on a 40 foot span rises 6.67 feet at the ridge, while an 8 in 12 roof on a 16 foot span rises only 5.33 feet despite being twice as steep. Span does the rest of the work, and a photograph of a house tells you about the combination rather than the pitch.
Worked example: measuring a 6 in 12 roof three ways
Take a single storey house, 40 feet along the ridge by 30 feet across, with a 12 inch overhang all round and a simple gable roof.
In the attic, a 24 inch level is held against the underside of a rafter, brought level, and the gap measured at the 24 inch mark reads 12 inches. Divided by 2 that is 6 inches of rise per 12 of run: a 6 in 12 pitch. A second rafter reads the same.
From the ground, a 12 inch level held against the rake board at the gable end gives a gap of a shade over 6 inches at the 12 inch mark. Call it 6 in 12, and note that the “shade over” is why the attic reading is the one to write down.
With an angle finder on an exposed rafter tail, the reading is 26.5 degrees. Converting back, 12 × tan(26.5°) is 5.98 inches, which rounds to 6 in 12. Three methods, one answer, and that agreement is the whole point of measuring more than once.
Now put the pitch to work. The multiplier is √(144 + 36) ÷ 12, which is 1.118. The plan area out to the drip edge is 42 by 32 feet, or 1,344 square feet. Roof surface is 1,344 × 1.118, about 1,503 square feet, which is 15.03 squares. The ridge sits 15 × 0.5 feet above the eave line, or 7.5 feet, and each roof plane measures 42 feet by 17.89 feet of slope. Every one of those figures came from one measurement in an attic. Put your own numbers through our estimator and it runs the same chain.

What pitch decides: material suitability
Roof coverings fall into two families, and pitch is the line between them. Steep-slope materials shed water: each piece overlaps the one below, and gravity plus the slope moves water off before it can find a lap. Low-slope materials seal water out with a continuous membrane, because at shallow angles water moves slowly, sits, and gets driven back up under laps by wind. Putting a shedding material on a slope too shallow for it is not a performance compromise, it is a leak with a delay built in.
Every material therefore has a minimum slope. The figures below are the ones commonly specified, and they are offered for orientation only. The deciding sources are your local building authority, which sets the code in force where you are, and the manufacturer’s printed application instructions for the specific product, which often set additional conditions such as an enhanced underlayment below a certain slope. Where those two disagree with a chart, the chart loses.
| Covering | Commonly specified minimum slope | The usual condition attached |
|---|---|---|
| Membrane systems (built-up, modified bitumen, single ply) | around 1/4 in 12 | Slope for drainage, not for shedding; ponding is the failure mode |
| Standing seam metal with sealed seams | often as low as 1/4 to 1 in 12 for some systems | Entirely system specific; the manufacturer’s stated minimum governs |
| Lapped or corrugated metal panels | around 3 in 12 | Exposed fastener panels rely on lap and slope together |
| Asphalt shingles | 2 in 12 as an absolute floor | Enhanced or doubled underlayment commonly required below about 4 in 12 |
| Wood shingles and shakes | around 3 to 4 in 12 | Often paired with an interlayment on the shallower end |
| Clay and concrete tile | around 2.5 in 12 | Reinforced underlayment commonly required at the low end |
| Slate | around 4 in 12 | Headlap increases as slope decreases |
If a measured pitch lands near a threshold, that is the moment to measure again by a second method. The difference between 3.5 in 12 and 4 in 12 can change the underlayment specification, the warranty terms, and sometimes the material choice entirely, and it is a difference well inside the error of a hurried reading.
Low-slope roofs are a different trade
Anything at roughly 2 in 12 and below behaves as a low-slope roof, and low-slope roofing is a separate discipline with its own materials, its own detailing, and its own failure modes. Calling such a roof “flat” is a convenient shorthand and slightly misleading, because a genuinely flat roof would hold water indefinitely. Even the shallowest membrane roofs are built with a deliberate fall so that water reaches a drain or a scupper.
What changes at low slope is where the waterproofing lives. On a steep roof the covering is a series of overlapping pieces and the underlayment is a secondary defense. On a low-slope roof the membrane is the roof, laps are welded or sealed rather than merely overlapped, and every penetration becomes a detail rather than a flashing.
The practical consequence for anyone measuring is that discovering a 1.5 in 12 pitch changes the project rather than adjusting it. A porch roof or a rear addition frequently sits in this range while the main house is at 6 or 8 in 12, and the two portions cannot share a material or an estimate. Measure each plane, keep them as separate line items all the way through the calculation, and expect the low-slope portion to be quoted by a different specialty. Our material estimating method makes the same case in general terms: pieces that behave differently get counted separately.
What pitch decides: walkability and labor
Roofers speak of walkable and non-walkable roofs, and the boundary is conventional rather than codified. As a working rule, roofs up to about 6 in 12 are commonly treated as walkable by experienced people in dry conditions with suitable footwear. From 7 in 12 to 9 in 12 the usual practice is roof jacks and planks or other staging to create level footing. At 10 in 12 and above, staging and fall protection are generally treated as a matter of course rather than a judgment call.
Those boundaries move down, sometimes drastically, for conditions that have nothing to do with pitch: morning dew, frost, moss or algae growth, loose granules on an aging surface, a thin layer of dust on a metal panel, and any doubt about the deck underneath. A dry 8 in 12 in July and a damp 8 in 12 in October are not the same roof.
The cost consequence is straightforward even though the amount is not. Steeper roofs take longer per square because material has to be carried up rather than slid across, because staging has to be built and moved as the work progresses, and because every task is done from a braced position rather than a comfortable one. Contractors commonly price this as a steep-slope premium that grows with the pitch. Any specific percentage would be an invention, so ask how a quote treats it rather than assuming a figure.
What pitch decides: drainage, wind, and snow
Steeper roofs shed water faster, which is the original reason they exist. Faster shedding means less time for water to find its way under a lap, less dwell time on the surface, and less opportunity for debris to build up in valleys. It also means more water arriving at the gutter per minute during a downpour, so gutter and downspout sizing is a function of roof area and slope together, not area alone.
Snow behaves in two opposing ways and the crossover is climate specific. Steep roofs shed snow readily, which reduces the accumulated load on the structure but drops that snow somewhere, which is why steep roofs over doorways and walkways need thought. Shallow roofs hold snow, which is a structural load question and also an ice dam question, since snow held above a warm attic melts, runs to a cold eave, and refreezes. Ice barrier requirements along eaves are set by local code precisely because of this, and a steeper roof needs more membrane to reach the same horizontal distance inside the wall line.
Wind interacts with pitch in a less intuitive way. Very shallow roofs experience strong uplift because air accelerating over the edge creates suction across the whole plane. Very steep roofs behave more like walls, taking direct pressure on the windward side. The middle range is generally the least demanding, which is one of several reasons the mainstream residential band sits where it does. None of that changes how you measure a pitch, but it explains why fastening patterns are sometimes specified differently at the extremes.
Common pitch families and what they signal
Pitches cluster, and knowing the clusters is a fast way to sanity check a measurement. If your reading lands somewhere no roof ever gets built, the reading is probably wrong.
| Pitch range | Where it usually turns up | What it means for the work |
|---|---|---|
| 1/4 in 12 to 2 in 12 | Porches, rear additions, garages, commercial-style roofs | Membrane territory; a separate trade and a separate estimate |
| 3 in 12 to 4 in 12 | Shed roofs, ranch houses, low additions, some modern designs | Easy to walk, near the shingle threshold, underlayment matters |
| 5 in 12 to 7 in 12 | The mainstream residential band on most housing stock | Walkable with care, ordinary shingle application, ordinary pricing |
| 8 in 12 to 9 in 12 | Steeper suburban roofs, story-and-a-half houses, dormered roofs | Roof jacks and staging; noticeably more labor per square |
| 10 in 12 to 12 in 12 | Older architecture, steep gables, snow country designs | Full staging and fall protection; a specialist conversation |
| Above 12 in 12 | Turrets, tower roofs, decorative and historic rooflines | Rarely a DIY subject at all; surface approaches twice the footprint |
Two patterns hold across most housing. Main house roofs cluster in the 4 to 9 in 12 band, and porches, additions, and garage roofs are usually shallower than the main roof they attach to. If you measure a porch as steeper than the house it is attached to, check the reading, because it is unusual enough to deserve a second look.
Roofs with more than one pitch
Most houses have more than one pitch and most estimates that go wrong assume otherwise. Additions built in a different decade rarely match. Porch and carport roofs are usually shallower. Dormers frequently have their own steeper roofs. Gambrel and mansard roofs have two distinct pitches on the same plane by design, with a steep lower section and a shallow upper one meeting at a break line.
The rule that keeps this manageable is to sketch the roof from above first, outline each plane, and assign each one a letter. Then measure the pitch of each lettered plane separately and write it on the sketch next to the plane. Planes carrying different pitches carry different multipliers, so they cannot be summed into a single footprint and multiplied once. Each one gets its own plan area, its own multiplier, and its own surface area, and only then do the surface areas add together.
Gambrel roofs deserve particular care because the break line is not obvious from every angle and the two pitches can be dramatically different, with lower sections sometimes approaching or exceeding 12 in 12 and upper sections down near 4 in 12. Measuring the visible lower slope and applying it to the whole roof will overstate the area substantially. Our square footage manual covers the underlying discipline of breaking an awkward outline into pieces you can actually multiply, which is the same habit applied to plan areas rather than roof planes.
Where a pitch measurement goes wrong
The errors repeat and they are all small physical mistakes rather than arithmetic ones. The level not being truly horizontal is the biggest: a bubble read at an angle, or a level resting on a nail head, tilts the reference line and the error lands entirely in the measured gap. Check the bubble from directly in front, not from below.
Measuring along the rafter instead of vertically is the second. The tape has to hang plumb, at right angles to the level, not square to the sloped surface. Square to the slope reads short, and the error grows with the pitch, which means it does the most damage exactly where accuracy matters most.
Measuring at 12 inches from the wrong end is the third, and it is easy to do when the level is longer than 12 inches. Mark the 12 inch point from the contact end, not from the far end. With a 24 inch level, remember the division by 2.
Then the situational ones. Measuring against a warped, sagged, or spliced rafter rather than a sound one. Measuring against a collar tie or a brace by mistake, since neither follows the roof plane. Measuring the horizontal fascia instead of the sloped rake board from the ground. Taking one reading and trusting it, when a second reading two feet away costs nothing and either confirms the number or reveals the problem. And measuring one plane on a house that has four different ones, which is the error that survives all the way to the material order.
Checking a measured pitch before you order
A pitch is worth a cross-check before anything is bought, and there are three cheap ones.
The first is the family check. Compare your reading against the common ranges above. A main roof at 6 in 12 is entirely ordinary. A main roof at 1 in 12 or 16 in 12 is unusual enough that the measurement is more likely wrong than the roof is unusual, so measure again.
The second is the degrees check. Convert your pitch to degrees and look at the roof. A 45 degree roof looks unmistakably like a 45 degree roof, and a 20 degree roof looks unmistakably shallow. If the number and the appearance disagree, one of them is lying, and it is almost always the number.
The third is the ridge height check, which is the strongest of the three because it uses a completely independent measurement. Multiply the run by the pitch ratio and you get the height of the ridge above the eave line. On a 30 foot span at 6 in 12 that is 15 × 0.5, or 7.5 feet. If you can measure or reasonably estimate the actual ridge height from the gable end, and it comes back near 7.5 feet, the pitch is confirmed by geometry rather than by a second reading of the same kind.
Do all three and the pitch is settled. Then it becomes an input rather than a question: our shingle manual takes it through to squares and bundles, our coverage reference collects the yield figures the rest of the order needs, and our estimating checklist puts the whole order in order.
The bottom line
Roof pitch is rise per 12 inches of horizontal run, and calculating it is one measurement plus, at most, one division. Establish a true horizontal with a level, mark 12 inches along it, and measure the vertical gap to the roof plane. Do it in the attic against a rafter if you possibly can, because that is both the safest place and usually the cleanest surface, and treat the roof surface and the ground as fallbacks rather than alternatives.
Everything else is derived from that single figure. Degrees come from arctan(rise ÷ 12), and 12 in 12 being exactly 45 degrees is the check that your calculator is behaving. The slope multiplier comes from √(144 + rise²) ÷ 12, straight out of the right triangle, which means you can compute any pitch rather than hunt for it in a table someone else rounded. Rafter length and ridge height come out of the same triangle for free.
What the pitch then decides is not arithmetic. Minimum slopes for roof coverings are set by your local building authority and the manufacturer’s own instructions, and a reading near a threshold deserves a second measurement before it turns into an order. Walkability is a convention that dew, frost, and moss can overturn in an hour. Measure it carefully, cross-check it against the ridge height, then take it to our estimator and let the arithmetic be the easy part it should be.
This is estimating and measurement education from the bench, not a roofing specification, a structural calculation, or a substitute for a qualified roofer’s inspection. Minimum slope figures, underlayment conditions, ice barrier extents, and fastening requirements above are described as commonly specified rather than as requirements: the code enforced by your local building authority and the manufacturer’s printed application instructions for your specific product are the only sources that decide, and they can differ from any chart including this one. Rafter and ridge dimensions here are surface geometry for estimating, not a cut list, and anything structural belongs to whoever is framing the roof. Working at height carries a real risk of serious injury, and the attic method exists so that a pitch reading never requires anyone to be on a slope.
Frequently asked questions
How do you calculate roof pitch?
Measure how many inches the roof rises across exactly 12 inches of horizontal run, and that vertical figure is the pitch. Hold a level dead horizontal with one end touching a rafter or the roof surface, mark 12 inches along it, then measure the vertical gap between the level and the roof at that mark. A 6 inch gap is a 6 in 12 pitch. Every other figure a roofer or an estimator wants, the angle in degrees and the slope multiplier that converts footprint into roof area, is calculated from that one measurement.
What is the safest way to measure roof pitch?
From inside the attic, against the underside of a rafter, with both feet on the joists and a work light. The rafter and the roof deck share the same slope, so the number you get in the attic is the number you would get on the shingles, without the fall risk that makes roof work one of the more serious hazards in residential construction. It is also usually the more accurate of the two, because rafters are straight sawn timber while a shingled surface is textured and slightly uneven. This manual treats the attic method as the default and everything else as a fallback.
How do you convert roof pitch to degrees?
Divide the rise by 12 and take the arctangent of the result, then read the answer in degrees. A 6 in 12 roof is arctan(6 ÷ 12), which is arctan(0.5), or about 26.57 degrees. A 12 in 12 roof is arctan(1), which is exactly 45 degrees, and that single known value is a useful check that your calculator is in degree mode rather than radians. Going the other way, rise equals 12 times the tangent of the angle, so 30 degrees works out to about 6.93 in 12.
What is the difference between roof pitch and roof slope?
In everyday trade language the two words are used interchangeably and both mean rise per 12 inches of run. In the stricter traditional sense, slope is the rise over the run expressed as x in 12, while pitch is the rise over the full span of the building expressed as a fraction. Because the run of a symmetrical gable is half the span, a 6 in 12 slope is a 1/4 pitch, and an 8 in 12 slope is a 1/3 pitch. The distinction matters mainly when reading older drawings or framing texts, where a fraction is meant literally rather than loosely.
What is the minimum roof pitch for asphalt shingles?
Asphalt shingles are commonly specified down to 2 in 12 as an absolute floor, with a doubled or otherwise enhanced underlayment required below roughly 4 in 12, and 4 in 12 and above treated as standard application. Those figures are not universal constants: the deciding sources are your local building authority and the manufacturer's printed application instructions for the specific product, and both can differ from the common figures. Below the manufacturer's stated minimum the product is outside its designed use and a warranty may not apply. If your measured pitch lands near a threshold, measure a second time before you order anything.
How do you find roof pitch from the ground?
Two approaches work without a ladder on the roof. Hold a level horizontally against the sloped rake board on the gable end where it comes down near the eave, mark 12 inches along the level, and measure the vertical gap, exactly as you would inside the attic. Alternatively stand well back, take a straight-on photograph of the gable end, and measure the triangle in the image, since ratios survive scaling and the rise divided by the run on the photo equals the ratio on the building. Both are rougher than the attic method and both are worth cross-checking against the common pitch families before you trust them.
What roof pitch is walkable?
As a rough working boundary, roofs up to about 6 in 12 are commonly treated as walkable by experienced roofers in dry conditions with proper footwear, 7 in 12 to 9 in 12 usually calls for roof jacks or additional staging, and 10 in 12 and steeper is generally treated as requiring fall protection and staging as a matter of course. Those are conventions rather than rules, and moss, frost, dew, brittle old shingles, and any doubt about the soundness of the deck move the boundary down sharply. Steeper roofs also carry a labor premium because the work is slower and the setup is longer.
Does roof pitch change how much material I need?
Yes, and by a calculable amount. The sloped surface is always larger than the flat footprint beneath it by a multiplier of the square root of 144 plus the rise squared, divided by 12. A 4 in 12 roof adds about 5.4 percent to the footprint area, a 6 in 12 adds about 11.8 percent, an 8 in 12 about 20.2 percent, and a 12 in 12 about 41.4 percent. On a 1,344 square foot footprint that spread is the difference between roughly 1,417 square feet of roof and roughly 1,900, which is nearly five squares of shingles.