What's on this page
- Before you start: tools, materials, and a permit check
- Step 1: Plan the wall and check permits and height limits
- Step 2: Choose a material and calculate the units
- Step 3: Lay out and dig the base trench
- Step 4: Build and level the compacted gravel base
- Step 5: Set and level the first course
- Step 6: Stack the courses with batter and setback
- Step 7: Add drainage, gravel backfill, and a drain pipe
- Step 8: Backfill, compact, and set the caps
- A worked example: a 20 foot wall, 3 feet high
- Why a retaining wall is mostly what you cannot see
- Block, timber, or stone: choosing a wall material
- Batter, setback, and how high you can safely build
- Common mistakes when building a retaining wall
- Troubleshooting: soft ground, bulging, and drainage problems
- Your retaining wall checklist
- The bottom line
Short answer: Build a retaining wall in eight steps: check permits and height, since walls above roughly 4 feet of exposed height commonly need an engineered design, have utilities located, calculate the units, dig the base trench and compact a gravel base, level and bury the first course, stack the courses with a backward batter, add drainage gravel and a perforated pipe behind the wall, then set the caps. Water topples walls, so the drainage matters most.
A retaining wall is one of those projects where the part that decides success is entirely out of sight once you finish. The face of stacked block or timber is what a visitor sees, but whether the wall still stands straight in five years is settled by things nobody will ever look at: a level compacted base below grade, a buried first course, a column of free-draining gravel behind the units, a drain pipe carrying water away, and a slight backward lean called batter. Skip or rush any of those and a wall that looked perfect on the last day begins to bulge, lean, and shed blocks by the second wet season.
This manual builds a retaining wall in eight plain steps, from checking whether your height needs a permit to setting the last cap, with a worked example carried all the way through to block and gravel quantities. Because a retaining wall holds back real earth, it carries real safety and code consequences, so the planning step is not optional paperwork: walls above roughly 4 feet of exposed height usually need an engineered design, and almost any wall should start with a call to have buried utilities located. The volume math leans on our material coverage reference and our how much gravel do I need manual, and you can run your own wall through the material estimator in about a minute. The companion below recalculates the block, base, and drainage order against your numbers as you read.
Key takeaways
- Plan and permit the wall first: walls above roughly 4 feet of exposed height commonly need an engineered design, and you should always have utilities located before you dig.
- The wall is built in a system: a compacted gravel base, a buried and perfectly level first course, battered courses, a free-draining gravel zone with a drain pipe, then caps.
- The first course is the make-or-break step, because every course above copies its level, so time spent leveling it is never wasted.
- Water is what topples walls, so the drainage gravel and the perforated pipe behind the wall matter more than anything you can see on the face.
- An illustrative 20 foot wall at 3 feet of exposed height works out to roughly 140 block units plus about 20 caps, around 1 cubic yard of base gravel, and about 2.6 cubic yards of drainage gravel.
Before you start: tools, materials, and a permit check
A retaining wall is a serious build, not an afternoon of stacking blocks, so the setup decides how the rest goes. Before anything is ordered or dug, five things need to be settled: the wall’s job and height, whether it needs a permit or engineering, the material, the tools, and the materials for each hidden layer. The single most expensive mistake is treating a retaining wall like a decorative garden edge when it is actually holding back a load.
What to settle and gather:
- The wall’s job and height. How tall is the exposed face, what is it holding back (a gentle garden bed, a steep slope, a driveway above), and is there a surcharge load near the top. A wall retaining a slope or a driveway is doing far more work than a wall edging a flat bed of the same height.
- Permit and engineering check. Confirm with your local building department whether your height and situation need a permit and an engineered design. A commonly cited threshold is around 3 to 4 feet of exposed height, but it is set locally and can be lower for loaded walls. Also call to have buried utilities located before any digging.
- The material. Segmental concrete block, pressure-treated timber, or natural stone, chosen for the height, budget, look, and your comfort with the method. The material sets the unit count and the way you build the batter.
- Tools and equipment. A tape measure, stakes and string, a line level and a torpedo and longer level, a shovel and a mattock, a hand tamper or a rentable plate compactor, a rubber mallet, a masonry saw or a splitter for block, a hand truck for moving units, gloves, and eye and hearing protection.
- The materials for each layer. The wall units plus caps, compactable base gravel for the leveling pad, clean angular drainage gravel for behind the wall, a perforated drain pipe, geotextile fabric, and a construction adhesive for the cap course.
Time and difficulty: a modest wall is a weekend or two of genuine labor, more if you dig by hand, and the arithmetic itself takes about ten minutes. The real skill is patience with the buried work: a level base, a level first course, and honest compaction. For a wall that is one line in a larger yard project, our how to estimate materials for a project manual frames this same takeoff as part of a full job. Get the plan and the permit question honest, and the eight steps that follow are mostly careful, repeatable work.
Step 1: Plan the wall and check permits and height limits
Start with the questions that decide whether you can build this wall yourself at all: how tall it is, what it holds, and what your jurisdiction requires. Measure or estimate the exposed height of the finished wall, the height of the face that will show above the soil in front of it, and the length along the run. Write both down in feet. Note what the wall retains, because a wall holding a flat garden bed is a different structure from one holding a slope or supporting a driveway above, even at the same height.
Now the part that is genuinely about safety, not bureaucracy. A widely cited rule of thumb is that walls up to roughly 3 to 4 feet of exposed height can often be built as a standard segmental or timber wall by a capable DIYer, while walls taller than about 4 feet usually need an engineered design and frequently a permit. That threshold is set locally, not nationally, and it drops when the wall carries a surcharge such as a driveway, a slope, or a structure near the top. The only reliable answer comes from your building department, so ask before you design, not after you dig.
Two calls belong in this step. The first is to the building department, to confirm the permit and engineering threshold for your exact height and situation. The second is to have buried utilities located, the free locate service that marks gas, electric, water, and communications lines before any excavation. Digging a base trench into an unmarked gas or electric line is the kind of mistake that ends far worse than a rebuilt wall.
Watch out for the temptation to shave the plan to duck a permit, building a wall an inch under the threshold that really wanted engineering, or splitting one tall wall into two stacked tiers without understanding that tiered walls can load each other and often need their own design. The height limit and permit exist because a failed retaining wall can injure people and damage property. Treat the illustrative figures here as a prompt to confirm the real local rule, and design the wall the situation actually calls for.
Step 2: Choose a material and calculate the units
With the height, length, and permit path settled, this step picks the material and turns the wall’s dimensions into an order. The three common choices are segmental concrete block, pressure-treated timber, and natural stone, and the choice sets both the look and the way you count units. Segmental block is the most common DIY route because the units interlock and set their own batter; timber is fast and cheap for low walls; stone is the most durable and the most skilled. Whatever you choose, the base and drainage materials underneath are the same.
For a segmental block wall, the unit count follows the wall face area. A common block presents roughly a 1 foot wide face and about a 6 inch course height, which works out to about 2 block units per square foot of wall face. Crucially, the face area includes the buried courses, not just the exposed height, because you build up from below grade. Take the running example of a 20 foot wall at 3 feet of exposed height: with the base buried about half a foot, the built height is roughly 3.5 feet, so the face is about 70 square feet, and at 2 units per square foot that is about 140 block units, plus roughly 20 cap units, one per foot of length.
Then calculate the two gravel orders, the same length times width times depth over 27 line our how to calculate cubic yards manual works in full. The base gravel is a leveling pad, illustratively about 2 feet wide and 6 inches deep along the run: 20 feet times 2 feet times 0.5 foot is about 20 cubic feet, near 0.9 cubic yards with a compaction allowance. The drainage gravel is the taller order: a zone about 1 foot wide behind the full 3.5 foot built height along the 20 foot run is 20 times 3.5 times 1, about 70 cubic feet, roughly 2.6 cubic yards. Our material coverage reference converts these zones into orderable quantities.

Watch out for counting only the exposed height when you order block, which leaves you a full buried course short, and for calculating the gravel in inches without converting to feet, which inflates the volume twelvefold. Carry the block, cap, base gravel, and drainage gravel figures separately, and run your own wall through the estimator to check the chain in seconds.
Step 3: Lay out and dig the base trench
Numbers settled, this step moves to the ground: mark the wall line exactly, then dig a level trench below grade for the base pad and the buried first course. Set stakes at each end of the run and pull a string line along the front face of the wall, checking it with a line level so the string is level end to end even where the ground is not. That string is your reference for the whole build, so set it carefully and leave it up.
The trench depth is the base pad plus the buried portion of the wall, not just the pad. A common approach is a 6 inch compacted gravel pad with the first course buried, and a frequently cited guide is to bury roughly 1 inch of wall for every 8 inches of exposed height, or at minimum bury the entire first course. For the running 3 foot wall, that means a pad of about 6 inches plus a buried first course of about 6 inches, so you excavate on the order of 12 inches below the soil level in front of the wall, and dig the trench wide enough for the block plus the drainage zone behind it, often around 24 inches or more.
Dig to a consistent depth along the whole run, checking down from the level string line rather than from the sloping ground. Strip any topsoil, roots, or soft organic material out of the trench bottom, because those settle and rot and take the wall down with them, and firm the subgrade. If the wall steps up a slope, plan to build the base in level sections that step up, so each section stays level rather than following the grade.
Watch out for a trench that follows the slope of the yard instead of stepping level, which leaves you trying to correct the fall in the base gravel where it will not hold, and for digging too narrow to fit the drainage zone behind the wall. A wide, level, clean trench is the foundation the whole wall inherits, so it is worth the extra digging now.
Step 4: Build and level the compacted gravel base
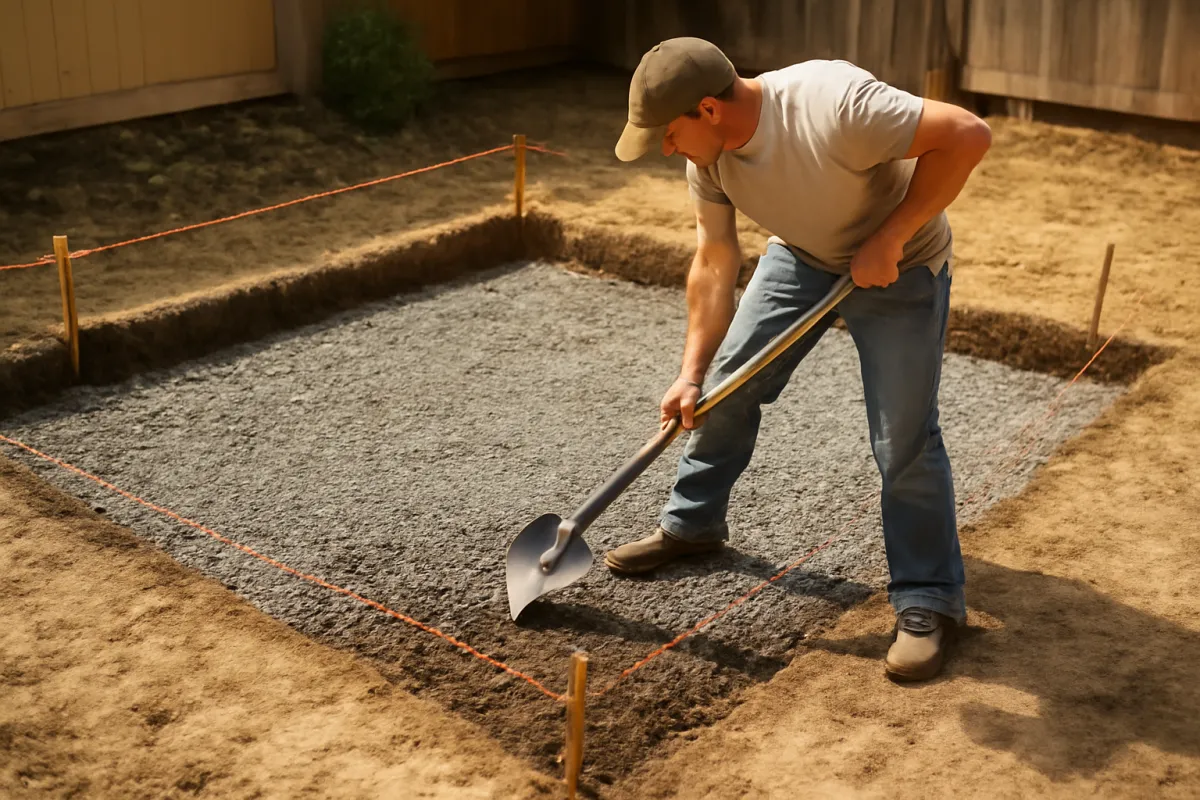
This step builds the leveling pad the entire wall rests on: a shallow layer of compactable crushed stone, tamped flat and level, in the bottom of the trench. Spread the base gravel, an angular crushed stone that locks together rather than a rounded stone that rolls, across the trench bottom to roughly the pad depth. Use a compactable base material with some fines, not the clean drainage stone that goes behind the wall; the two gravels do different jobs and are not interchangeable.
Compact the pad in a lift, wetting it lightly so it packs tight, and level it as you go. A hand tamper works for a short wall; a rentable plate compactor is faster and firmer for a longer run. The target is a pad that is flat, firmly compacted, and dead level across its width and along its length, checked with a level against the string line. This is where you spend patience: a base that is a little high at one end or crowned in the middle forces every course above it out of level, and there is no fixing that later without lifting the wall.
For the running 20 foot example, the pad at 2 feet wide and 6 inches deep is about 20 cubic feet of base gravel, near 0.9 cubic yards with the compaction allowance. That is a small order compared with the drainage gravel, but it is the most precisely placed material in the whole build, because everything references it.

Watch out for compacting a pad that is too thick in one pass, which leaves the bottom loose, and for eyeballing level instead of checking it with a real level against the string. A pad that is honestly flat and firm now is a wall that stacks true later, so this is not the step to hurry through to get to the visible stacking.
Step 5: Set and level the first course
This is the single most important step in the whole build: setting the first course of units on the pad and getting every one of them perfectly level, front to back and side to side, and level with its neighbors. Every course above copies the first, so a first course that is off by a small amount magnifies upward into a wall that leans or steps out of true. Begin at the lowest point of the run if the wall steps up a slope, and work from a corner or a fixed end so the line stays straight.
Set each unit onto the compacted pad and check it with a torpedo level in both directions, tapping it down with a rubber mallet to seat it and adjusting the pad gravel underneath by tiny amounts to bring it level. Check the tops of adjacent units against each other with a longer level or a straightedge so the whole course sits in one plane. Sweep the pad clean of loose stone under each unit, because a single pebble under a block tips it out of level and telegraphs up the wall.
For the running example, the first course is buried, sitting below the soil line in front of the wall, which is exactly what braces the base of the wall against kicking outward. The buried course is counted in the block order from Step 2, which is why the face area used the built height of about 3.5 feet rather than the 3 feet you see. Do not skip burying it to save a course; that buried row is structural.
Watch out for rushing the first course to get to the satisfying part of stacking. A frequently repeated piece of wall wisdom is that you spend half the total care of the build on the base and first course, because they are the only layers you cannot correct once they are covered. Level, seat, and check every unit in the first course, then check the whole course again before the second row goes on.
Step 6: Stack the courses with batter and setback
With a level first course down, this step stacks the wall upward while building in the slight backward lean, the batter or setback, that lets the wall resist the soil. Batter is the small amount each course sits back from the one below, tilting the wall into the slope it holds. A dead-vertical wall has nothing working in its favor against the outward push of soil, while a wall leaning slightly back uses its own geometry to stay put, which is why every retaining wall system builds in some setback.
Many segmental block systems create the batter automatically: a rear lip that hooks over the course below, or holes for pins that seat each block a fixed distance back, commonly on the order of an eighth to an inch of setback per course. You simply seat each block fully back against its lip or pin and the batter builds itself. A timber or stone wall has no automatic setback, so you batter it by hand, stepping each course back a consistent small amount and checking the lean with a level held at an angle or a batter gauge.
Stagger the vertical joints as you stack, offsetting each course so the seams do not line up, the same running-bond logic that ties a brick wall together, so the wall behaves as one interlocked mass rather than stacked columns. Check the wall for level along each course and for consistent batter as you climb, correcting small drifts early while they are easy. Keep the drainage gravel from Step 7 filling in behind the wall as you go rather than all at the end, because it is far easier to place in layers alongside the rising courses.
Watch out for building the wall dead vertical or, worse, leaning forward, which points the wall the way the soil wants to push it, and for letting the joints stack instead of staggering them, which creates a weak vertical seam. Follow the specific setback your block system specifies rather than a generic figure, and check the batter as diligently as you check the level.
Step 7: Add drainage, gravel backfill, and a drain pipe
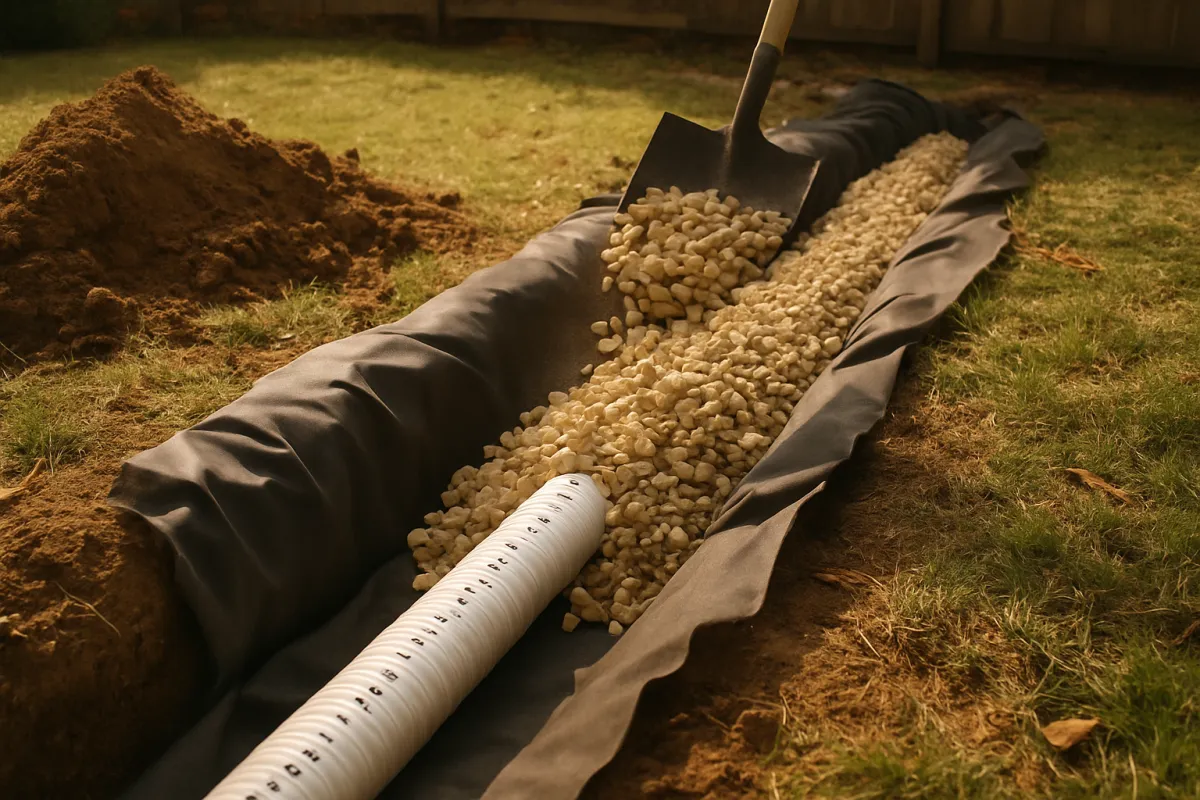
This step builds the system that actually keeps the wall standing: the drainage behind it. Water is the primary force that topples retaining walls, because saturated soil behind a wall weighs more and pushes far harder than dry soil, so the entire goal is to make sure water never accumulates behind the units. That is done with three things working together: a zone of clean draining gravel, a perforated pipe to carry water away, and a fabric to keep soil out of the gravel.
Start by laying geotextile fabric against the soil at the back of the excavation, separating the native soil from the drainage stone so fines cannot migrate in and clog it over time. At the base, behind the first courses, lay a perforated drain pipe, sometimes called a drain tile or weeping tile, along the run, with the perforations positioned to admit water and the pipe sloped gently so it carries collected water to an outlet that daylights at the end of the wall or ties into a drain. A pipe with nowhere to drain is just a buried tube, so plan the outlet before you bury it.
Then fill the zone directly behind the wall with clean, angular, free-draining crushed stone, often a 3/4 inch clear or washed stone with few fines, keeping it a foot or so wide behind the units and rising with the courses. This is the drainage gravel from Step 2, and for the running 20 foot wall at about 3.5 feet built height and a 1 foot wide zone it is roughly 70 cubic feet, about 2.6 cubic yards, the largest single material order in the build. Its whole purpose is to give water a fast path straight down to the pipe instead of pressing against the wall.
Watch out for backfilling behind the wall with the native soil you dug out, especially clay, which holds water and pressure against the wall, and for laying a drain pipe with no outlet so it fills and does nothing. The drainage system is invisible the day you finish, which is exactly why it gets skimped, and exactly why the walls that fail are almost always the ones that skimped it.
Step 8: Backfill, compact, and set the caps
The final step closes out the wall: backfilling the soil behind the drainage zone, compacting it in lifts, and gluing on the cap course that finishes the top. Behind the foot-wide column of drainage gravel, replace the native soil in layers, compacting each lift with a tamper before adding the next, so the ground behind the wall is firm rather than loose and prone to settling. Compact gently near the wall so you do not shove it forward, and keep the drainage gravel and fabric intact as you fill.
Bring the backfill up to the finished grade you want behind the wall, and grade the surface so surface water sheds away from the top of the wall rather than pouring over it and behind it. A wall with a good buried drain still does not want a river running over its top edge, so the finished grading matters as much as the pipe. If the top of the wall meets a lawn or bed, a slight slope away from the wall keeps runoff from loading the backfill.
Finally, set the caps. Most segmental systems finish with a cap unit, often a slightly different block, bonded to the top course with a bead of exterior construction adhesive so the caps cannot be knocked or lifted off. Sweep the top course clean, run the adhesive, and set each cap flush and aligned, checking the line. For the running example that is about 20 cap units along the 20 foot run, one of the smaller line items in the order but the one that makes the wall look finished and keeps the top course locked down.
Watch out for backfilling with loose, uncompacted soil that settles into a trench behind the wall and pools water, and for setting caps without adhesive so they shift underfoot or lift in a freeze. Compact the backfill honestly, grade the top to shed water, and bond the caps, and the wall is finished the way it should be, tight from the buried base to the capped top.
A worked example: a 20 foot wall, 3 feet high
Pull the eight steps together on one realistic build, a 20 foot long segmental block wall at 3 feet of exposed height, holding a garden bed rather than a driveway, and watch the plan flow from a tape measure to a material order.
Step 1, plan: the wall is 20 feet long and 3 feet exposed, holding a modest bed, which sits under a commonly cited engineering threshold of about 4 feet, but you still confirm the local permit rule and have utilities located before digging. Step 2, calculate: with the base buried about half a foot, the built height is roughly 3.5 feet, so the face is about 70 square feet, about 140 block units at 2 per square foot, plus about 20 caps; the base pad at 2 feet wide and 6 inches deep is about 20 cubic feet, near 0.9 cubic yards; the drainage zone at 1 foot wide and 3.5 feet tall along 20 feet is about 70 cubic feet, roughly 2.6 cubic yards.
Step 3, dig: excavate a level trench about 12 inches below the front grade and around 24 inches wide, stepping level if the run climbs. Step 4, base: spread and compact a 6 inch pad of angular base gravel, dead level on the string line. Step 5, first course: set and level every unit of the buried first course, checking each in both directions. Step 6, stack: build up about six more courses to the 3 foot exposed height, seating each block back on its lip for the automatic batter and staggering the joints. Step 7, drainage: lay fabric and a sloped perforated pipe, and fill a foot-wide zone of clean stone behind the wall as it rises. Step 8, finish: backfill and compact the soil in lifts, grade the top to shed water, and adhesive the roughly 20 caps.
So one measured wall produces a clean order: about 140 block units, about 20 caps, roughly 0.9 cubic yards of base gravel, and about 2.6 cubic yards of drainage gravel, plus a perforated pipe, fabric, and adhesive. Change any input and the order moves predictably: extend the wall to 30 feet and the block climbs toward 210 units and the drainage gravel toward 3.9 cubic yards; raise the exposed height past about 4 feet and you cross into engineered-wall territory entirely. Run your own dimensions through the estimator and the arithmetic, including the buried course and the divide-by-27 steps, is done for you.
Block units by wall length, at 3 feet high
Segmental block units for a wall at 3 feet exposed height, including one buried base course, at about 2 units per square foot of built face.
The unit count scales straight with length: the 20 foot example is about 140 block units, and the 30 foot wall, half again as long, is about 210. Each bar is 2 units times length times the 3.5 foot built height, with widths tracking the counts against the largest.
Why a retaining wall is mostly what you cannot see
The single idea that separates a wall that stands from one that fails is that a retaining wall is a drainage and foundation system with a decorative face, not a stack of blocks, so it is worth understanding what the hidden parts do before trusting the plan. A finished wall shows only the face and the caps, but four buried elements carry the actual load: the compacted base, the buried first course, the drainage gravel and pipe, and the compacted backfill.
The base pad and buried first course are the foundation. The pad spreads the wall’s weight onto firm subgrade and gives a level start, and the buried course braces the bottom of the wall so it cannot kick outward as the soil pushes. The drainage gravel and pipe are the pressure-relief system: soil behind a wall wants to push it over, and wet soil pushes far harder than dry, so the gravel gives water a fast path down to the pipe, which carries it away before it can build up. The compacted backfill is the mass the wall works against, firm rather than loose so it neither settles nor turns into a reservoir. The visible face and caps are almost the least important structural part, which is the opposite of how a beginner instinctively weights the job.
Where a retaining wall's material budget goes
Illustrative share of the material order for a typical low segmental wall, by rough proportion of the order.
The segments are illustrative shares of the material order and sum to 100 percent. The lesson is that roughly half the order is the hidden gravel, pipe, and fabric, not the visible units, which is why cutting the buried system to save money quietly buys a wall that fails.
The chart shows the simplest version, but the lesson holds however you size it: much of what you buy and most of what you labor over is invisible in the finished wall. Get the buried system wrong, most often by skimping the drainage or the base, and the wall leans or bulges no matter how neat the face looked on day one.
Block, timber, or stone: choosing a wall material
The material you choose affects the look, the cost, the lifespan, and the way you build, so it is worth a moment before you buy. Segmental concrete block is the most common DIY choice for a reason: the units are engineered to interlock and to set a consistent batter through a lip or a pin, so the wall builds itself straighter than a beginner could build it freehand. Blocks are heavy and the cutting needs a masonry saw or splitter, but the system does much of the structural thinking for you, which is why most first walls are block.
Pressure-treated timber is the fast, forgiving, lower-cost option for low walls. Timbers cut easily, go up quickly, and forgive a beginner’s hand, but they have a finite lifespan even when treated, and a timber wall relies on pinning the courses together with spikes or rebar and on deadmen, timbers that run back into the slope to anchor the wall. Timber suits a low, casual wall on a budget where a limited lifespan is acceptable. Natural stone, dry-stacked or mortared, is the most durable and the best looking, and a well-built stone wall outlasts everything, but it is the most skill-intensive and slowest to build, because every stone is fitted by hand and the batter and coursing are all judgment.
The practical rule is to match the material to the wall’s height, your budget, the look you want, and your honest comfort with the method, then remember that all three still need the same base, drainage, and backfill underneath. A block wall on no drainage fails just like a stone wall on no drainage. Our how to lay a paver patio manual covers the same base-and-compaction discipline for a flat surface, and the buried-system logic carries straight over to a wall.
Batter, setback, and how high you can safely build
Two related ideas govern whether a wall of a given height is safe to build yourself: the batter that leans it back, and the height threshold that calls for engineering. Batter, or setback, is the backward lean, and it exists because soil pushes outward, so a wall tilted slightly back into the slope resists that push with its own geometry while a vertical wall does not. Segmental systems set the batter automatically through their lip or pin, commonly on the order of an eighth to an inch of setback per course, so seating each block fully back builds the correct lean without measuring. Timber and stone walls are battered by hand, stepping each course back a consistent small amount checked against a level or a batter gauge.
Height is where the safety math turns serious. A commonly cited rule of thumb puts the DIY comfort zone at roughly 3 to 4 feet of exposed height for a standard segmental or timber wall, with walls above about 4 feet usually needing an engineered design and often a permit. That threshold falls when the wall carries a surcharge, a driveway, a slope, or a structure loading the top, because the wall is then holding far more than its own height of soil. It also gets more complex with tiered walls, where two shorter walls stacked up a slope can load one another and may need to be designed as a system rather than as two independent short walls.
The honest posture is that these figures are illustrative prompts, not code. A retaining wall that fails can hurt people and damage property, so the height limit is not red tape, it is the line past which the loads exceed what a rule-of-thumb wall can safely hold. Confirm your local threshold, and when your wall is tall, loaded, or tiered, bring in an engineer rather than stretching a DIY method past what it was meant to do.
Common mistakes when building a retaining wall
A handful of errors account for nearly every retaining wall that fails early, and all of them are decisions made in the buried work, not accidents afterward.
- No drainage behind the wall. Backfilling straight against the units with native soil, especially clay, traps water and pressure and is the single most common reason walls bulge and topple. Build the gravel zone, the pipe, and the fabric, and give the pipe a real outlet.
- A base that is not level or not compacted. The whole wall inherits the base, so a pad that is high at one end or loose in the middle produces a wall that leans or settles. Compact the pad and check it dead level before a single unit goes down.
- Skipping the buried first course. Setting the wall on top of the ground instead of burying the base leaves nothing bracing the bottom against the outward push. Bury the base per the height rule of thumb, and count that course in the order.
- Building dead vertical or leaning forward. A wall with no batter has nothing resisting the soil, and a forward lean points it the way the soil pushes. Seat block fully back on its lip, or hand-batter timber and stone into the slope.
- Ignoring the height and permit threshold. Building a tall or loaded wall as a rule-of-thumb DIY wall, or splitting it into tiers to duck a permit, risks a failure with real consequences. Confirm the local threshold and engineer the wall when the height or load calls for it.
- Loose, uncompacted backfill. Dumping the soil back in without compacting leaves a settling trench behind the wall that pools water and drops the grade. Backfill in lifts and compact each one, gently near the wall.
Every one of these is a decision about something invisible in the finished wall, the drainage, the base, the buried course, the batter, the backfill, which is exactly why they get skipped and exactly why they matter.
Troubleshooting: soft ground, bulging, and drainage problems
Real yards rarely match the firm, gently sloping ground the basic build assumes, so here is how to handle the conditions that complicate a wall.
What if the ground is soft or wet? Soft subgrade under the base is a real problem, because the wall’s load will press it down unevenly. The answer is depth and separation, not more sand: dig out the soft material to firmer ground, lay geotextile fabric, and build a thicker, wider compacted base so the load spreads across a footprint the ground can hold. The same base-building logic our how to build a gravel driveway manual uses for soft sites applies directly to a wall’s base.
What if an existing wall is bulging or leaning? A bulge or a forward lean almost always means water pressure behind the wall, a failed or missing drainage system, or an undersized wall for its load. These are not surface fixes: shoving a leaning wall back or facing over a bulge treats the symptom while the cause, trapped water or an overloaded wall, keeps working. A bulging or leaning wall, especially a tall one, is a signal to stop and get a professional assessment rather than patch it, because a failing retaining wall can come down suddenly.
What about water seeping through or pooling behind the wall? Seepage through the face is usually the drainage system doing its job, moving water out, though heavy, constant seepage can mean the pipe outlet is blocked or the backfill is holding too much water. Water pooling behind or above the wall points to grading that sheds toward the wall instead of away, so regrade the top to fall away from the wall and confirm the drain pipe outlet is clear. The through-line is that water problems trace back to the buried drainage and the surface grading, not to the face.
What if the wall needs to be taller than the DIY range? If the situation genuinely calls for a wall above about 4 feet, or a wall loaded by a driveway or slope, that is the point to bring in an engineer rather than stretching a rule-of-thumb method. A properly engineered tall wall may use geogrid reinforcement layered back into the soil, a wider base, or a different system entirely, and those are design decisions, not something to improvise from a general tutorial.
Your retaining wall checklist
Before the units are ordered and before the first shovel goes in, run down this compact checklist. It is the save-this asset of the whole build.
- Measured the exposed height and the length, and noted what the wall retains.
- Confirmed the local permit and engineering threshold, and had buried utilities located before digging.
- Chose the material and calculated the units on the built height, including the buried course, plus caps.
- Calculated the base gravel as a compacted pad and the drainage gravel as a zone behind the full built height.
- Dug a level trench below grade, stepping level on a slope, and stripped out soft or organic material.
- Built and compacted a level base pad, checked dead level against a string line.
- Set and leveled every unit of the buried first course in both directions before stacking on.
- Stacked the courses with the system’s batter or a hand-battered lean, staggering the joints.
- Laid fabric, a sloped perforated drain pipe to an outlet, and a clean free-draining gravel zone behind the wall.
- Backfilled and compacted the soil in lifts, graded the top to shed water, and bonded the caps with adhesive.
Work top to bottom and the wall you build is one that drains, resists the soil, and holds its line for years. The companion below runs the unit, base, and drainage calculations automatically on your own dimensions, so you can check your hand math before you order.
The bottom line
Building a retaining wall is eight steps worn into a sequence: plan and permit the wall, choose a material and calculate the units, dig a level base trench, compact a level base pad, set a perfectly level buried first course, stack the courses with batter, build the drainage gravel and pipe behind the wall, then backfill, compact, and cap. The whole thing rests on a few disciplines that are invisible once the last cap is set, a level base, a level first course, a real drainage system, and honest compaction, which is exactly why the walls that fail are the ones that rushed them. Settle the height and permit question first, because it decides whether this is a DIY wall at all, then give the base and first course the patience they demand and the drainage the respect it deserves. Do that, and the wall you build is the straight, well-drained, still-standing kind that holds its ground long after the day it was capped, which is the only kind worth the weekend.
Read this manual as bench notes meant to teach the method, not as a build you can order and dig without checking. Retaining walls hold back real earth and can injure people or damage property when they fail, so the heights, permit thresholds, engineering triggers, depths, batter figures, and volumes here are typical illustrative values, not code, and your real requirements shift with the wall height, the load, the soil, the climate, and local rules. Confirm the permit and engineering threshold with your building department, have utilities located before you dig, and verify the base, drainage, structural, and safety details, along with the final quantities, with the people doing the work and your local requirements before any material is delivered.
Frequently asked questions
How do you build a retaining wall step by step?
Plan the wall and confirm whether your height needs a permit or an engineer, choose a material, then calculate the units and the base and drainage gravel. Dig a level base trench below grade, build and compact a gravel leveling pad, and set the first course perfectly level, because every course above copies it. Stack the remaining courses with the built-in batter or setback, place free-draining gravel and a perforated drain pipe behind the wall as you go, then backfill and compact in lifts and finish with the caps. This manual walks all eight steps with a worked example carried through to real block and gravel quantities.
How high can you build a retaining wall without an engineer?
A commonly cited rule of thumb is that walls up to roughly 3 to 4 feet of exposed height can often be built as a standard segmental or timber wall by a capable DIYer, while walls taller than about 4 feet usually need an engineered design and frequently a permit. The exact trigger height varies by jurisdiction and by what the wall retains, so a wall holding up a driveway, a slope, or a surcharge load can require engineering at a lower height. Treat any height figure here as an illustrative starting point, not a code citation. Confirm your local threshold with the building department before you design the wall, because taller walls carry real failure and safety consequences.
Do I need a permit to build a retaining wall?
Often yes, especially above a certain exposed height, and the threshold is set locally rather than nationally. Many jurisdictions cite a figure around 3 to 4 feet as the point where a permit and an engineered design are required, and some require a permit for any wall that retains a slope, supports a structure, or carries a surcharge such as a driveway above it. A short decorative garden wall a foot or two high is frequently exempt, but the only reliable answer comes from your local building department. Check before you dig, both for the permit and for buried utilities, because unpermitted or undersized walls can have to be rebuilt.
How deep should the base be for a retaining wall?
A common approach is a compacted gravel leveling pad about 6 inches deep sitting in a trench dug below grade, with the first course of the wall buried so that a portion of the wall starts underground. A frequently cited guide is to bury roughly 1 inch of wall for every 8 inches of exposed height, or at minimum bury the entire first course, so the total excavation is often around 12 inches or more below the finished soil in front of the wall. Burying the base is what keeps the bottom of the wall from kicking outward under load. Treat these depths as illustrative and adjust for your soil and wall height.
What kind of gravel goes behind a retaining wall?
The zone directly behind a retaining wall is filled with a clean, angular, free-draining crushed stone, often a 3/4 inch clear or washed drainage stone with few fines, so water moves down through it rather than building up pressure against the wall. This drainage gravel is different from the compactable base gravel under the wall and different again from the soil you backfill farther back. A geotextile fabric usually separates the drainage stone from the surrounding soil so fines do not clog it. Our material coverage reference helps convert the drainage zone into a volume you can order.
Do retaining walls need a drain pipe?
Most walls above a low garden-edging height benefit from a perforated drain pipe, sometimes called a drain tile or weeping tile, laid at the base behind the wall inside the drainage gravel and sloped to daylight or a drain so collected water can escape. Water is the primary thing that pushes a wall over: saturated soil behind a wall exerts far more pressure than dry soil, so the whole drainage system, gravel plus pipe plus an outlet, exists to keep water from ever accumulating. A very short decorative wall may drain adequately through gravel alone, but for anything holding back real soil the pipe is cheap insurance. Confirm the detail for your wall height and soil.
What is batter or setback on a retaining wall?
Batter, or setback, is the slight backward lean built into a retaining wall so that each course sits a little behind the one below it, tilting the whole wall back into the slope it holds. Many segmental block systems build this in automatically through a lip or pin that sets each block back a fixed amount, commonly around an eighth to an inch per course, while a timber or stone wall is battered by hand as you build. The lean matters because a wall tilted slightly back resists the outward push of the soil far better than a dead-vertical wall, which has nothing working in its favor. Follow the setback your specific block system specifies rather than a generic number.
Block, timber, or stone: which is best for a retaining wall?
Segmental concrete block is the most common DIY choice because the units are engineered to interlock and set their own batter, which makes a consistent wall easier to build. Pressure-treated timber is faster and cheaper for low walls and forgiving to cut, but it has a finite lifespan and needs pinning and deadmen for stability. Natural stone, dry-stacked or mortared, is the most durable and best looking but the most skill-intensive and slowest to build. The right choice depends on the wall height, your budget, the look you want, and your comfort with the method, and all three still need the same base, drainage, and backfill discipline underneath.